About this blog

Sunday, June 17, 2012

First ever YouTube Blogger Road Show : 16th of June 2012

0 comments
So, I went to this Bloggers' Road Show conducted by Google this Saturday, 16th of June 2012. Reaching there was quite a pain since, even though Google's premises in balmy B'lore is quite swanky, the same can't be said about the exact location where the premises be located :). The Bangalore Metro being slothful, slowwww, so slow!,  didn't help the cause too much either. After all the needful security checks, generation of name tag etc, I popped in the room around 20 mins into the seminar :). Apparently, didn't miss much 'cos I seemed to latch onto the conversation right away. Anyways, that was the prologue :) getting on with business now...

In the words of the presenter herself, the road show was going to be all about...
 "Want to be a YouTube star? Here's your chance to do what you love to do, become a star on YouTube, reach a global audience and even get paid!"
(Hah! many lonely vloggers would have loved to have the "P" in the last word of the sentence be replaced with "L" :P )

The following were some of the bullet points which one gained from the session:
  • The Indian Demographic of the YouTube "Diaspora" view, on an average of 7-15 videos in a single viewing session.
  • Most Indian users (i.e. around 60%) use YouTube for accessing Indian content. (Duh!)
  • This is because the recommendation engine for youtube users has been spruced up quite a few notches in the recent past.
  • The advertisement generating engine has also been improved it appears and the various types of ads coming into play for YouTube were also discussed. 
  • The "3 R"s of YouTube were revealed as "Reach. Revenue. Recognition". On a "Content is King" platform like YouTube, the user gets access to these '3 R's.
  • The current time limit for uploads is going to be revised pretty soon. But the scrutiny for copyrighted items remain the same.
  • Apparently, being a YouTube partner is going to help monetizing on one's original content in YouTube in a better manner than the regular Adsense steam. (I do have my own apprehensions on this. BTW the money generated from being a partner is still going to be tracked and paid with Adsense UI and tools). Revenue breakup will be 55% (YouTube partner) and 45% (YouTube/Google)
  • Having one's own channel is one of the important means towards this end.
  • The mechanism for becoming a partner is going to come online pretty soon.
  • Having original content which is engaging is very very crucial in this case. Couple of videos were shown to illustrate this. Video blogs of Gayatri Vantillu (Houswife/Recipe vlogger) and Michelle Phan (Makeup Artist/vlogger and THE highest earning youtube partner) were shown as examples of people with simple and original content who were making very good amounts of money out of youtube. While on the other hand, Dr. K Chaudhury was quoted as an example of a hugely popular YouTube star who is ineligible for the partnership since his material uses highly copyrighted items (except for the singing which is super original :P lol .. i remember hearing one of his fans saying its easier to tolerate Chinese torture than to endure a round of songs with Dr. KC! :P) . Several very popular bloggers apparently were also quoted as moving to the YouTube medium ever since partnership was announced to them. 
  • So, its  like the medium has given rise to a whole new generation of stars, "The youtube stars" as they are called. 
  • A thick thick skin for scathing criticism, very important :)(e.g: "I remain in fray because I look at 10 thousand people who like my performance and not at 10 million people who hate my performance. Assessing me as good or bad, you gifted me your precious time – that is what makes me feel obliged to you." ~ Dr. KC at some pointed criticisms in the comments of an American Blog)
Having heard all the above, one does feel a lot motivated and excited by the possibilities available at ones disposal with such a powerful platform like this. But, then so was the case when blogging was the hottest kid in school, and being a blogger was not going to be only about being cool but also apparently a very economically fulfilling enterprise. Hmmm, then we see all kinds of waylaid, defunct and sporadic blogs by the thousands (or millions is it? and even I may be counted among them :P ) which are neither cool nor making money nor are they even records of our times in many cases. Actually, the fact of the matter is that, no matter what kind of platforms exist and how powerful or easy to use they become, the only way one can become successful in any of these is by being very original, very creative and by overcoming one's personal inertia (toughest of all).
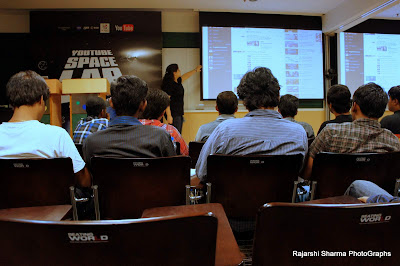
As I end on that very topic-disconnected and mood-swing-y note, I leave you with some pictures of the event and its presentation. 'til l8r...
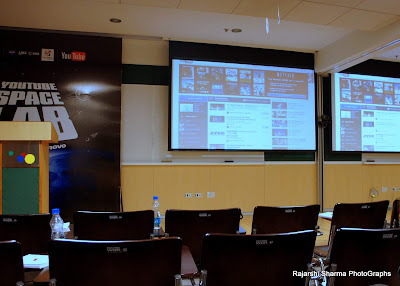
YouTube Blogger's Meet and RoadShow Google Bangalore

YouTube Blogger's Meet and RoadShow Google Bangalore

YouTube Blogger's Meet and RoadShow Google Bangalore

YouTube Blogger's Meet and RoadShow Google Bangalore

YouTube Blogger's Meet and RoadShow Google Bangalore

Sunday, October 2, 2011

Sample Code for Deep and Shallow Cloning ~ Java

0 comments
Was just going over deep and shallow cloning a few days back.. thought of retaining the doodling bit of code as a memento .. its unnecessarily lengthy ... could've overriden the tostring method to reduce the length of the system.out.printlns .. but then the sample is just for my reference so dint go through the trouble ... use at ur own fancy and convenience .... anyways, the following is the code:::


public class TestCloning {
public static void main(String[] somestuff) {
System.out.println("<<---------Trying out shallow cloning------>>>");
A a = new A();
A aClone = (A) a.clone();
System.out.println("Original Object items:\n BUilder: "
+ a.getStrBuilder() + "\n BUffer: " + a.getStrBuffer()
+ "\n Printing the clone properties -->\n BUilder: "
+ aClone.getStrBuilder() + "\n BUffer: "
+ aClone.getStrBuffer());
System.out
.println("\n Modifying the builder of original object to \'GUilder\'.....\n");
a.setStrBuilder("GUilder");
System.out
.println("after modfiication Original Object items:\n BUilder: "
+ a.getStrBuilder()
+ "\n BUffer: "
+ a.getStrBuffer()
+ "\n Printing the clone properties -->\n BUilder: "
+ aClone.getStrBuilder()
+ "\n BUffer: "
+ aClone.getStrBuffer());
System.out.println("<<--------End of shallow cloning: ---->>\n");


System.out.println("\n<<-----------Trying out deep cloning------>>");
B b = new B();
B bClone = (B) b.clone();
System.out.println("Original Object items:\n BUilder: "
+ b.getStrBuilder() + "\n BUffer: " + b.getStrBuffer()
+ "\n Printing the clone properties -->\n BUilder: "
+ bClone.getStrBuilder() + "\n BUffer: "
+ bClone.getStrBuffer());
System.out
.println("\n Modifying the builder of original object to \'GUilder\'.....\n");
b.setStrBuilder("GUilder");
System.out
.println("after modfiication Original Object items:\n BUilder: "
+ b.getStrBuilder()
+ "\n BUffer: "
+ b.getStrBuffer()
+ "\n Printing the clone properties -->\n BUilder: "
+ bClone.getStrBuilder()
+ "\n BUffer: "
+ bClone.getStrBuffer());
System.out.println("<<--------------End of Deep cloning: ---->>");


}


}


class A implements Cloneable {
private StringBuilder strBuilder = null;
private StringBuffer strBuffer = null;


A() {
strBuilder = new StringBuilder("Java Builder");
strBuffer = new StringBuffer("Java Buffer");
}


@Override
public A clone() {
try {
return (A) super.clone();
} catch (CloneNotSupportedException e) {
// TODO Auto-generated catch block
return null;
}
}


public StringBuilder getStrBuilder() {
return strBuilder;
}


public void setStrBuilder(String str) {
this.strBuilder = strBuilder.replace(0, strBuilder.length(), str);
}


public StringBuffer getStrBuffer() {
return strBuffer;
}
}


class B implements Cloneable {
private StringBuilder strBuilder = new StringBuilder("Java Builder");
private StringBuffer strBuffer = new StringBuffer("Java Buffer");


private B(String a, String b) {
this.strBuilder = new StringBuilder(a);
this.strBuffer = new StringBuffer(b);
}


public B() {
// TODO Auto-generated constructor stub
}


@Override
public B clone() {
return new B("Java Builder", "Java Buffer");
}


public StringBuilder getStrBuilder() {
return strBuilder;
}


public void setStrBuilder(String str) {
this.strBuilder = strBuilder.replace(0, strBuilder.length(), str);
}


public StringBuffer getStrBuffer() {
return strBuffer;
}
}

Saturday, January 9, 2010

Configure 5.1 Channel Sound on Ubuntu-Karmic Koala (for dummies like me!)

3 comments

UPDATE: The following tutorial also helps set up 5.1 channel audio in Ubuntu Maverick Meerkat as well.
Intro
I recently upgraded to the new Karmic Koala after nearly a year of using Intrepid Ibex (with which I had become quite comfy and so I hadn´t upgraded to Jaunty).
A common problem with most of the earlier Ubuntu versions (previous to Karmic Koala) was the setting up of the sound systems with channels more than 2 (or 2.1 for that matter). This was easily solved by adding a couple of lines in the daemon file for pulseaudio and the alsa-base configuration file for ALSA. With the advent of Karmic Koala, this problem was to be fixed with all the sound profiles etc. which would provide an ¨easier-than-windows¨ approach to setting up your sound.
Hmmm, seems great to read, but it lasted only till I heard/read this stuff, ´cause when I setup Karmic Koala, and changed the sound profile to my setup of 5.1 channel sound, Bam!... still no sound from the rear, center and LFE speakers. So, yet again with this version too, I rolled up my sleeves and set out to...
¨Configure 5.1 Channel Speaker system on Karmic Koala¨ ......

Though the article looks long, the steps are really short cos most of the text is for explaining the steps to myself and keep me from forgetting them ;)
Setup 5.1 channel sound in 5.1 steps (a.k.a. cut to the chase, enough with the intro babble!)
1) Take a backup of the files daemon.conf and alsa-base.conf. (In case you mess something up, cos not everyoneÅ› as smart as me.. Most are more! :P)
Daemon.conf is located in the path ¨/etc/pulse/¨
alsa-base.conf is located in ¨/etc/modprobe.d/¨


And yeah, before I move onto the next steps, make sure that you have alsamixer installed in the system
(gtk+ version was found to be more convenient, u can get it from the software center or synaptic or add/remove programs)


2) Open a terminal window and type:
sudo gedit /etc/pulse/daemon.conf

This will open the pulse audio file for editing after you provide your password
Look for the line

;default-sample-channels=2

Remove the ; (this is to uncomment the line) and put the number of speakers which you have after the equals sign and save the file.
In my case, the line looked something like this:


default-sample-channels=6


3) Find the sound card which u have. For that, in the terminal window

cat /proc/asound/card0/codec#* | grep Codec


For me it gave

Codec: Realtek ALC883


4) In the terminal window, type the follwong command:
sudo gedit /etc/modprobe.d/alsa-base.conf

This will open the ALSA configuration file for editing after you provide your password.
Go to the end of the file and add the line

options snd-hda-intel model=3stack-6ch

and save the file.
The value entered after the word model is specific to the configuration which I have i.e Realtek ALC883 with 3 jack setup at the back of the cabinet. If you have a different model or configuration of jacks then you might want to look in the list given at the end of the post for whatever value suits your model.
5) Restart your computer.
5.1) After restart, if you find the sound is still not coming from all your speakers, then open the alsa mixer from under applications--> Sound & Video -->ALSA Mixer, select the 6ch in the channel mode section and make sure none of the output volume controls are muted or turned very low. Type the following command in the terminal command line:
      speaker-test -Dplug:surround51 -c6 -l1 -twav

Conclusion:
Well, your 5.1 channel sound should be up and running by now. If it isn´t, then, theres some other problem with your setup and you might consider giving it a serious diagnostic check up.
As, for the Karmic Koala Ubuntu, it promises a lot of things and in most cases ..it does deliver ...but having labor like this every time I setup my system is downright irritating ..hope u folks at Canonical are listening and righting these wrongs.
I have also made a video tutorial of the steps so as to better illustrate the entire operation.
Video tutorial


List of soundcard model/settings
Soundcard
--------------
Model name Description
---------- -----------
ALC880
3stack 3-jack in back and a headphone out
3stack-digout 3-jack in back, a HP out and a SPDIF out
5stack 5-jack in back, 2-jack in front
5stack-digout 5-jack in back, 2-jack in front, a SPDIF out
6stack 6-jack in back, 2-jack in front
6stack-digout 6-jack with a SPDIF out
w810 3-jack
z71v 3-jack (HP shared SPDIF)
asus 3-jack (ASUS Mobo)
asus-w1v ASUS W1V
asus-dig ASUS with SPDIF out
asus-dig2 ASUS with SPDIF out (using GPIO2)
uniwill 3-jack
fujitsu Fujitsu Laptops (Pi1536)
F1734 2-jack
lg LG laptop (m1 express dual)
lg-lw LG LW20/LW25 laptop
tcl TCL S700
clevo Clevo laptops (m520G, m665n)
test for testing/debugging purpose, almost all controls can be
adjusted. Appearing only when compiled with
$CONFIG_SND_DEBUG=y
auto auto-config reading BIOS (default)


ALC260
hp HP machines
hp-3013 HP machines (3013-variant)
fujitsu Fujitsu S7020
acer Acer TravelMate
will Will laptops (PB V7900)
replacer Replacer 672V
basic fixed pin assignment (old default model)
auto auto-config reading BIOS (default)


ALC262
fujitsu Fujitsu Laptop
hp-bpc HP xw4400/6400/8400/9400 laptops
hp-bpc-d7000 HP BPC D7000
benq Benq ED8
benq-t31 Benq T31
hippo Hippo (ATI) with jack detection, Sony UX-90s
hippo_1 Hippo (Benq) with jack detection
sony-assamd Sony ASSAMD
basic fixed pin assignment w/o SPDIF
auto auto-config reading BIOS (default)


ALC268
3stack 3-stack model
toshiba Toshiba A205
acer Acer laptops
auto auto-config reading BIOS (default)


ALC662
3stack-dig 3-stack (2-channel) with SPDIF
3stack-6ch 3-stack (6-channel)
3stack-6ch-dig 3-stack (6-channel) with SPDIF
6stack-dig 6-stack with SPDIF
lenovo-101e Lenovo laptop
auto auto-config reading BIOS (default)


ALC882/885
3stack-dig 3-jack with SPDIF I/O
6stack-dig 6-jack digital with SPDIF I/O
arima Arima W820Di1
targa Targa T8, MSI-1049 T8
asus-a7j ASUS A7J
asus-a7m ASUS A7M
macpro MacPro support
mbp3 Macbook Pro rev3
imac24 iMac 24'' with jack detection
w2jc ASUS W2JC
auto auto-config reading BIOS (default)


ALC883/888
3stack-dig 3-jack with SPDIF I/O
6stack-dig 6-jack digital with SPDIF I/O
3stack-6ch 3-jack 6-channel
3stack-6ch-dig 3-jack 6-channel with SPDIF I/O
6stack-dig-demo 6-jack digital for Intel demo board
acer Acer laptops (Travelmate 3012WTMi, Aspire 5600, etc)
acer-aspire Acer Aspire 9810
medion Medion Laptops
medion-md2 Medion MD2
targa-dig Targa/MSI
targa-2ch-dig Targs/MSI with 2-channel
laptop-eapd 3-jack with SPDIF I/O and EAPD (Clevo M540JE, M550JE)
lenovo-101e Lenovo 101E
lenovo-nb0763 Lenovo NB0763
lenovo-ms7195-dig Lenovo MS7195
haier-w66 Haier W66
6stack-hp HP machines with 6stack (Nettle boards)
3stack-hp HP machines with 3stack (Lucknow, Samba boards)
auto auto-config reading BIOS (default)


ALC861/660
3stack 3-jack
3stack-dig 3-jack with SPDIF I/O
6stack-dig 6-jack with SPDIF I/O
3stack-660 3-jack (for ALC660)
uniwill-m31 Uniwill M31 laptop
toshiba Toshiba laptop support
asus Asus laptop support
asus-laptop ASUS F2/F3 laptops
auto auto-config reading BIOS (default)


ALC861VD/660VD
3stack 3-jack
3stack-dig 3-jack with SPDIF OUT
6stack-dig 6-jack with SPDIF OUT
3stack-660 3-jack (for ALC660VD)
3stack-660-digout 3-jack with SPDIF OUT (for ALC660VD)
lenovo Lenovo 3000 C200
dallas Dallas laptops
hp HP TX1000
auto auto-config reading BIOS (default)


CMI9880
minimal 3-jack in back
min_fp 3-jack in back, 2-jack in front
full 6-jack in back, 2-jack in front
full_dig 6-jack in back, 2-jack in front, SPDIF I/O
allout 5-jack in back, 2-jack in front, SPDIF out
auto auto-config reading BIOS (default)


AD1882
3stack 3-stack mode (default)
6stack 6-stack mode


AD1884
N/A


AD1981
basic 3-jack (default)
hp HP nx6320
thinkpad Lenovo Thinkpad T60/X60/Z60
toshiba Toshiba U205


AD1983
N/A


AD1984
basic default configuration
thinkpad Lenovo Thinkpad T61/X61


AD1986A
6stack 6-jack, separate surrounds (default)
3stack 3-stack, shared surrounds
laptop 2-channel only (FSC V2060, Samsung M50)
laptop-eapd 2-channel with EAPD (Samsung R65, ASUS A6J)
laptop-automute 2-channel with EAPD and HP-automute (Lenovo N100)
ultra 2-channel with EAPD (Samsung Ultra tablet PC)


AD1988
6stack 6-jack
6stack-dig ditto with SPDIF
3stack 3-jack
3stack-dig ditto with SPDIF
laptop 3-jack with hp-jack automute
laptop-dig ditto with SPDIF
auto auto-config reading BIOS (default)


Conexant 5045
laptop Laptop config
test for testing/debugging purpose, almost all controls
can be adjusted. Appearing only when compiled with
$CONFIG_SND_DEBUG=y


Conexant 5047
laptop Basic Laptop config
laptop-hp Laptop config for some HP models (subdevice 30A5)
laptop-eapd Laptop config with EAPD support
test for testing/debugging purpose, almost all controls
can be adjusted. Appearing only when compiled with
$CONFIG_SND_DEBUG=y


STAC9200
ref Reference board
dell-d21 Dell (unknown)
dell-d22 Dell (unknown)
dell-d23 Dell (unknown)
dell-m21 Dell Inspiron 630m, Dell Inspiron 640m
dell-m22 Dell Latitude D620, Dell Latitude D820
dell-m23 Dell XPS M1710, Dell Precision M90
dell-m24 Dell Latitude 120L
dell-m25 Dell Inspiron E1505n
dell-m26 Dell Inspiron 1501
dell-m27 Dell Inspiron E1705/9400


STAC9205/9254
ref Reference board
dell-m42 Dell (unknown)
dell-m43 Dell Precision
dell-m44 Dell Inspiron


STAC9220/9221
ref Reference board
3stack D945 3stack
5stack D945 5stack + SPDIF
intel-mac-v1 Intel Mac Type 1
intel-mac-v2 Intel Mac Type 2
intel-mac-v3 Intel Mac Type 3
intel-mac-v4 Intel Mac Type 4
intel-mac-v5 Intel Mac Type 5
macmini Intel Mac Mini (equivalent with type 3)
macbook Intel Mac Book (eq. type 5)
macbook-pro-v1 Intel Mac Book Pro 1st generation (eq. type 3)
macbook-pro Intel Mac Book Pro 2nd generation (eq. type 3)
imac-intel Intel iMac (eq. type 2)
imac-intel-20 Intel iMac (newer version) (eq. type 3)
dell-d81 Dell (unknown)
dell-d82 Dell (unknown)
dell-m81 Dell (unknown)
dell-m82 Dell XPS M1210


STAC9202/9250/9251
ref Reference board, base config
m2-2 Some Gateway MX series laptops
m6 Some Gateway NX series laptops
pa6 Gateway NX860 series


STAC9227/9228/9229/927x
ref Reference board
3stack D965 3stack
5stack D965 5stack + SPDIF
dell-3stack Dell Dimension E520


STAC9872
vaio Setup for VAIO FE550G/SZ110
vaio-ar Setup for VAIO AR